• This is a political forum that is non-biased/non-partisan and treats every person's position on topics equally. This debate forum is not aligned to any political party. In today's politics, many ideas are split between and even within all the political parties. Often we find ourselves agreeing on one platform but some topics break our mold. We are here to discuss them in a civil political debate. If this is your first visit to our political forums, be sure to check out the RULES. Registering for debate politics is necessary before posting. Register today to participate - it's free!

Fixing broken plastic

Green Balls

Resident Cat Expert
DP Veteran
Joined
Sep 24, 2012
Messages
1,292
Reaction score
645
Location
Indianapolis
Gender
Male
Political Leaning
Other
Issue: I'm trying to fix a broken plastic cylinder. It's about 1" in diameter with a crack down the side. I've used superglue and gorilla glue in the past in similar circumstances, but they don't seem to work, so I wasn't going to waste my time trying that avenue on this part. I was thinking about getting one of those small butane torches and melting it together, but I'm afraid I might melt too much.

Getting a new plastic cylinder is out of the question since it's a piece inside of a printer and the part is not available online. I got the printer for free from one of my clients since it wasn't working. I still haven't figured out how to take it apart to get to the broken part, so I figured I would check for some suggestions before I embark on the 4-5 hour journey (according to some posts I've read online about dismantling this particular model printer).

If I can't fix the part, it's no big deal. But it's a nice printer and I'd hate to toss it without giving it a chance. I figure my worse case scenario is taking a mold of the part and casting a new plastic piece.
 
Try CPVC or PVC glue - in the plumber's supply aisle of any hardware store or even some department discount stores like Walmart.
 
Issue: I'm trying to fix a broken plastic cylinder. It's about 1" in diameter with a crack down the side. I've used superglue and gorilla glue in the past in similar circumstances, but they don't seem to work, so I wasn't going to waste my time trying that avenue on this part. I was thinking about getting one of those small butane torches and melting it together, but I'm afraid I might melt too much.

Getting a new plastic cylinder is out of the question since it's a piece inside of a printer and the part is not available online. I got the printer for free from one of my clients since it wasn't working. I still haven't figured out how to take it apart to get to the broken part, so I figured I would check for some suggestions before I embark on the 4-5 hour journey (according to some posts I've read online about dismantling this particular model printer).

If I can't fix the part, it's no big deal. But it's a nice printer and I'd hate to toss it without giving it a chance. I figure my worse case scenario is taking a mold of the part and casting a new plastic piece.

I recommend trying sugru. It is amazing. It sounds as if it may be the solution to your problem.
 
It's literally just a cylinder? Or is the part more complicated? What is it's function?
 
Issue: I'm trying to fix a broken plastic cylinder. It's about 1" in diameter with a crack down the side. I've used superglue and gorilla glue in the past in similar circumstances, but they don't seem to work, so I wasn't going to waste my time trying that avenue on this part. I was thinking about getting one of those small butane torches and melting it together, but I'm afraid I might melt too much.

Getting a new plastic cylinder is out of the question since it's a piece inside of a printer and the part is not available online. I got the printer for free from one of my clients since it wasn't working. I still haven't figured out how to take it apart to get to the broken part, so I figured I would check for some suggestions before I embark on the 4-5 hour journey (according to some posts I've read online about dismantling this particular model printer).

If I can't fix the part, it's no big deal. But it's a nice printer and I'd hate to toss it without giving it a chance. I figure my worse case scenario is taking a mold of the part and casting a new plastic piece.


If the part is subjected to repeated mechanical stresses, most glues aren't going to hold up, and will eventually fail. Even if you find the right glue for the type of plastic.

And most likely you will over-heat the plastic if you try to heat it directly.

So glue it just to hold it for further repair.
Depending on the thickness of the plastic, find some metal that you believe is the appropriate size.
Such as a staple, a paperclip (steel would be better than aluminum, but both work), a pin or needle, even a trash-bag tie can work in some instances. Even an untwisted guitar string.
(don't try to use solder)

Shape the metal to your needs. Like if it needs to be rounded to fit an interior or exterior curved surface or a 90 degree angle.

Melt this piece of metal into the plastic as a type of staple spanning the crack/break.
Leaving it straight will work, but I prefer to bend the ends to give what I believe is more hold.

Two ways to effect this repair.
Leave a long end to hold onto while you heat up the other.
Once red hot, place it into the plastic you wish to repair.
Sometimes it takes several attempts to get it level with the surface. (fully embedded)
Hold there until cooled enough. (just seconds)
Once solidly in place, snip off the long end.
In this instance, I have used a piece of the metal twisted into a tight flat circle at the end to heat up and try to smooth out the plastic that gets displaced from the makeshift staple. (It holds heat just a tad bit longer curled into a circle.)

or

Cut and shape the metal piece to what you desire.
Lay, or if you need to make sure it doesn't move, tape or superglue it in place.
Then use a solder iron to melt it into the plastic you wish to repair.
This method allows you to "brush" over the plastic with the iron to even out it's appearance once fixed.
You can use a household iron in this instance, but you run the chance of staining it's ironing surface.
Where as a soldering tip can be abrasively cleaned.

Unless it doesn't matter, be careful not to melt it entirely through the plastic you are repairing.


I have used this method to repair many types of plastic things. From head phones that broke in half to plastic gears and other plastic mechanical parts.
I have not had the repaired area break again.

If you are not mechanically inclined, try practicing first.

Hope this helps.
 
Last edited:
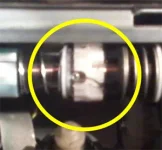
It's a cylinder gear with large notches that engage with another gear having the same size notches. This particular part is famous for breaking in this printer and giving a false paper jam error, since the gear doesn't engage and turn the shaft.

I'll try melting some metal into it to fix it. If there wasn't such a small clearance area, I would have went with a pipe clamp. Here's a pic so you know what I'm dealing with:

gear.webp
 
Issue: I'm trying to fix a broken plastic cylinder. It's about 1" in diameter with a crack down the side. I've used superglue and gorilla glue in the past in similar circumstances, but they don't seem to work, so I wasn't going to waste my time trying that avenue on this part. I was thinking about getting one of those small butane torches and melting it together, but I'm afraid I might melt too much.

Getting a new plastic cylinder is out of the question since it's a piece inside of a printer and the part is not available online. I got the printer for free from one of my clients since it wasn't working. I still haven't figured out how to take it apart to get to the broken part, so I figured I would check for some suggestions before I embark on the 4-5 hour journey (according to some posts I've read online about dismantling this particular model printer).

If I can't fix the part, it's no big deal. But it's a nice printer and I'd hate to toss it without giving it a chance. I figure my worse case scenario is taking a mold of the part and casting a new plastic piece.

You can always try JB Weld.
It's thick but strong, just make sure you clean the surface before applying the epoxy.
Once it's cured you can sand it down.
 
JB Weld is the strongest stuff I've ever tried for anything... it's a "weld in a tube".

They make JB Plastic Weld... we used it to put a cheap plastic radiator back together like a jigsaw-puzzle one time, and the women drove the car another six months like that.

Try it.

Just be careful... whatever you JB Weld literally might as well be welded together. Mind your fingers.
 
Use a plastic welder ... a real tool ... probably a cheap one could be found at Harbor Freight in Indy... identify the type of plastic by code.. practice on similar plastic prior to performing the task... Good luck to you sir.
 
JB Weld is the strongest stuff I've ever tried for anything... it's a "weld in a tube".

They make JB Plastic Weld... we used it to put a cheap plastic radiator back together like a jigsaw-puzzle one time, and the women drove the car another six months like that.

Try it.

Just be careful... whatever you JB Weld literally might as well be welded together. Mind your fingers.

I try to keep some on hand, it's great stuff.
 
The type of repair required will depend largely on the type of stresses the part sees, and what sort of plastic you are dealing with. From what it looks like, the part in question, since it's a gear, is subject to shearing forces at the crack point. Most glues do brilliantly when the force on the repair is directly opposing the two bonded surfaces, but poorly when the bond is subject to shearing force. Remember that commercial for superglue with the man in the hardhat hanging from his hardhat glued to an I-beam? Rock that hard hat back and forth a bit and the superglue would have broken in short order.

Most plastic welding chemicals can't do bonds with polyethylene or polypropelene plastic. That's why superglue and gorilla glue fail when they do, aside from being subject to shearing forces.

Replacing the part will most likely be necessary.
 
It's a cylinder gear with large notches that engage with another gear having the same size notches. This particular part is famous for breaking in this printer and giving a false paper jam error, since the gear doesn't engage and turn the shaft.

I'll try melting some metal into it to fix it. If there wasn't such a small clearance area, I would have went with a pipe clamp. Here's a pic so you know what I'm dealing with:

View attachment 67142264
I can make out the crack. But that is about it.
It looks like there may be enough space for two separate "staples".


Staples would look something like this.


Points.jpg


And laid across the crack, once you have compressed it together.


Melt.jpg


If it is a rotating part, make sure your repair does not interfere with it's rotation.
 
It's a cylinder gear with large notches that engage with another gear having the same size notches. This particular part is famous for breaking in this printer and giving a false paper jam error, since the gear doesn't engage and turn the shaft.

Then attempting to "repair" it is just a waste of time - it's just likely to break again.

I can see why that piece fractures commonly. That circular notch is a stress riser. The inner edge of the circular notch is in tension whenever the gear is being driven. Tension + cyclical load case = fatigue cracks over time. Plastic is brittle so even a tiny fatigue crack will propagate. A **** engineer designed that.

First of all, why don't you just buy a brand new cheap printer from best buy for like $50?

If for some reason this printer really is worth fixing to you, then I would replace that plastic piece with an identical metal one. From what I can see in that grainy little thumbnail, it's just a cylinder with a pair of milled notches in the end? If so that's simple to machine. Just take it to a local machine shop and ask them how much it would cost to machine an identical one from metal - probably aluminum 6061 but whatever the shop has handy is fine.

I used to work in a tool & die shop back in the '90s, so this idea has crossed my mind.
 
Then attempting to "repair" it is just a waste of time - it's just likely to break again.
Not with the repair I have suggested.
And not in the same place.

If there is another area on the cylindrical piece of the same type, it may be wise to melt some staples in it before it breaks but it definitely isn't a wasted time or effort.
 
If the part is subjected to repeated mechanical stresses, most glues aren't going to hold up, and will eventually fail. Even if you find the right glue for the type of plastic.

And most likely you will over-heat the plastic if you try to heat it directly.

So glue it just to hold it for further repair.
Depending on the thickness of the plastic, find some metal that you believe is the appropriate size.
Such as a staple, a paperclip (steel would be better than aluminum, but both work), a pin or needle, even a trash-bag tie can work in some instances. Even an untwisted guitar string.
(don't try to use solder)

Shape the metal to your needs. Like if it needs to be rounded to fit an interior or exterior curved surface or a 90 degree angle.

Melt this piece of metal into the plastic as a type of staple spanning the crack/break.
Leaving it straight will work, but I prefer to bend the ends to give what I believe is more hold.

Two ways to effect this repair.
Leave a long end to hold onto while you heat up the other.
Once red hot, place it into the plastic you wish to repair.
Sometimes it takes several attempts to get it level with the surface. (fully embedded)
Hold there until cooled enough. (just seconds)
Once solidly in place, snip off the long end.
In this instance, I have used a piece of the metal twisted into a tight flat circle at the end to heat up and try to smooth out the plastic that gets displaced from the makeshift staple. (It holds heat just a tad bit longer curled into a circle.)

or

Cut and shape the metal piece to what you desire.
Lay, or if you need to make sure it doesn't move, tape or superglue it in place.
Then use a solder iron to melt it into the plastic you wish to repair.
This method allows you to "brush" over the plastic with the iron to even out it's appearance once fixed.
You can use a household iron in this instance, but you run the chance of staining it's ironing surface.
Where as a soldering tip can be abrasively cleaned.

Unless it doesn't matter, be careful not to melt it entirely through the plastic you are repairing.


I have used this method to repair many types of plastic things. From head phones that broke in half to plastic gears and other plastic mechanical parts.
I have not had the repaired area break again.

If you are not mechanically inclined, try practicing first.

Hope this helps.

Wow. I'm impressed.

Me? I'd get a part-time job if I had to in order to buy a new one. ;)
 
Not with the repair I have suggested.
And not in the same place.

If there is another area on the cylindrical piece of the same type, it may be wise to melt some staples in it before it breaks but it definitely isn't a wasted time or effort.

Melting staples into it is the worst idea I've ever heard. That's not a proper fix. Several wraps of fiberglass tape around the cylinder would work better than what you suggested.

But that's just a temporary fix. If he wants the printer to last, he should replace the part.
 
I used to work in a tool & die shop back in the '90s, so this idea has crossed my mind.

You got some good replies here. I would go with the JB weld or a plastic weld myself first as it is the simplest and test see how it works. Plastic weld works by fusing chemically to pieces of plastic together just like a metal weld would work. It looks like it is not subject to really intense torque so thats the way I would go. The JB weld epoxy itself probably several times stronger than the simple PVC type plastic you are repairing so it should hold fine if it has a bite on the material. Excons is a good repair too. Machining the part out of aluminum or metal will probably wear out the black plastic part much more quickly. If you do that repair then I would machine the mate to it as well. The machine work though would cost you more than the printer is worth I think. I think the PVC weld is the best repair followed by the expoxy or excons repair, followed by machining the new part. Thats my two cents.
 
You got some good replies here. I would go with the JB weld or a plastic weld myself first as it is the simplest and test see how it works. Plastic weld works by fusing chemically to pieces of plastic together just like a metal weld would work. It looks like it is not subject to really intense torque so thats the way I would go. The JB weld epoxy itself probably several times stronger than the simple PVC type plastic you are repairing so it should hold fine if it has a bite on the material. Excons is a good repair too. Machining the part out of aluminum or metal will probably wear out the black plastic part much more quickly. If you do that repair then I would machine the mate to it as well. The machine work though would cost you more than the printer is worth I think. I think the PVC weld is the best repair followed by the expoxy or excons repair, followed by machining the new part. Thats my two cents.

I'm going to try the JB Weld and see how that goes. At the moment, I'm still trying to find a service manual for the printer to find out how to take it apart in the right order. If I can't find one, I'll have to break out my camera and start the tedious process of photographing each step as I take it apart.
 
I'm going to try the JB Weld and see how that goes. At the moment, I'm still trying to find a service manual for the printer to find out how to take it apart in the right order. If I can't find one, I'll have to break out my camera and start the tedious process of photographing each step as I take it apart.

Good luck with your project. If for whatever reason the repair doesnt take you could use the part to make a mold and form new plastic piece.
 
But that's just a temporary fix. If he wants the printer to last, he should replace the part.
Actually it isn't a temp fix.
And replacing or making a new one from the same plastic will have the same part failing again because of it's design.
Better to fix it so it doesn't break again.


Melting staples into it is the worst idea I've ever heard. That's not a proper fix. Several wraps of fiberglass tape around the cylinder would work better than what you suggested.

But that's just a temporary fix. If he wants the printer to last, he should replace the part.
:slapme:
The staple method works quite well. You melt a piece of metal into it as a staple.
And, as it does "fix" the problem, it is a proper "fix". :doh
And will last longer than any other method (besides finding or creating a new part) stated here.


As previously stated, I have used the method to repair many of things.
And as you haven't tried it, don't knock it.


I'm going to try the JB Weld and see how that goes. At the moment, I'm still trying to find a service manual for the printer to find out how to take it apart in the right order.
How about telling us what the make and model is?
Maybe others can help you find the manual or even the part.
 
How about telling us what the make and model is?
Maybe others can help you find the manual or even the part.

It's an HP Officejet Pro 8500. I figured buying a new part would end with the same result. I've found at least 30 other people with the same exact issue with this printer, so it's a poor part design.
 
It's an HP Officejet Pro 8500. I figured buying a new part would end with the same result. I've found at least 30 other people with the same exact issue with this printer, so it's a poor part design.
I've spent about 2¾ hours looking.

Keywords included, "diagram", "disassemble (ly)", "schematic", "exploded view", "service manual" .
Besides web pages, my search included images as well as video's.

Apparently you are not the only one to have this problem, and not just with this model.

Unfortunately I have not been able to find a service manual for download or even an image of an exploded view, etc...
Maybe another will have better luck.


Besides the 8500, this forum also speaks of the same issue with the 8000.
HP Officejet Pro 8500 Wireless with fake paper jam - fixyourownprinter.com
Looks similar doesn't it? Except with two areas of fracture.
Fract.jpg


The following site carries probably the most parts I have seen for that printer. Yet I do not see your part listed.
HP CB022A HP Officejet Pro 8500 All-in-One Printer - A909a by Hewlett Packard at Everprint


I still suggest the metal staple solution as it is the cheapest one that works.


As I said, I also searched video's.
Here is one person's permanent solution to the problem. Enjoy!
 
Back
Top Bottom