• This is a political forum that is non-biased/non-partisan and treats every person's position on topics equally. This debate forum is not aligned to any political party. In today's politics, many ideas are split between and even within all the political parties. Often we find ourselves agreeing on one platform but some topics break our mold. We are here to discuss them in a civil political debate. If this is your first visit to our political forums, be sure to check out the RULES. Registering for debate politics is necessary before posting. Register today to participate - it's free!

woodworking repair question

Cardinal

Respected On All Sides
DP Veteran
Joined
Jun 20, 2008
Messages
106,580
Reaction score
98,349
Gender
Male
Political Leaning
Independent
We were able to score an incredible antique solid oak bed frame for a steal which would otherwise be in fantastic condition if not for this damaged section on one of the front feet. One picture for the damaged foot and one for the undamaged foot for comparison:
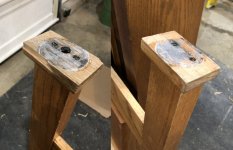
bed frame leg.jpg

I don't have the original shard of wood that came off so there's nothing to glue back together. So my first thought was to carve/saw out a clean cross section of the damaged foot, fill it in with the right size piece of unused oak flooring that I have lying around, glue it in place, sand it and finish to match. The problem is that there's no obvious way I can think of to get a solid clean cut (assuming this is even the best solution -- it may not be. If I were dead certain I wouldn't have started this thread).

I can't get it onto the table saw, a miter saw is no good, there's no makeshift edgeguide I can clamp on to use a circular saw, and I have a high powered dremel (1.8 amp) but I'm still at a loss for how I'd get a clean cut with that.

Second thought: rout out that section from above (or, rather, the bottom of the foot) rather than from the side. Problem with that idea is that I only have heavy duty routers (fixed and plunge) when a trim router would almost certainly be more manageable for such a small space. You could technically turn the dremel into a router, but I'm hesitant to use a what is really a glorified crafts tool for a refinishing job.

Thoughts?
 
Hm, I'm no wood worker but I'd putty, sand and stain that puppy.
 
Hm, I'm no wood worker but I'd putty, sand and stain that puppy.
I will always see that putty. I know from experience that gluing with the right wood, careful sanding and even more careful finishing can create an almost seamless appearance from a normal viewing distance.
 
I will always see that putty. I know from experience that gluing with the right wood, careful sanding and even more careful finishing can create an almost seamless appearance from a normal viewing distance.

Oops! I thought the surface you're talking about is on the bottom of one of the feet and therefore wouldn't be seen. My bad.
 
We were able to score an incredible antique solid oak bed frame for a steal which would otherwise be in fantastic condition if not for this damaged section on one of the front feet. One picture for the damaged foot and one for the undamaged foot for comparison:

View attachment 67365734

I don't have the original shard of wood that came off so there's nothing to glue back together. So my first thought was to carve/saw out a clean cross section of the damaged foot, fill it in with the right size piece of unused oak flooring that I have lying around, glue it in place, sand it and finish to match. The problem is that there's no obvious way I can think of to get a solid clean cut (assuming this is even the best solution -- it may not be. If I were dead certain I wouldn't have started this thread).

I can't get it onto the table saw, a miter saw is no good, there's no makeshift edgeguide I can clamp on to use a circular saw, and I have a high powered dremel (1.8 amp) but I'm still at a loss for how I'd get a clean cut with that.

Second thought: rout out that section from above (or, rather, the bottom of the foot) rather than from the side. Problem with that idea is that I only have heavy duty routers (fixed and plunge) when a trim router would almost certainly be more manageable for such a small space. You could technically turn the dremel into a router, but I'm hesitant to use a what is really a glorified crafts tool for a refinishing job.

Thoughts?

Shave the piece and dowel it back together to original measurement.

Just match up the grain and you're golden.

I do it all the time.
 
Shave the piece and dowel it back together to original measurement.

Just match up the grain and you're golden.

I do it all the time.
Shave the piece with what? And why would I dowel the pieces together if I can glue it?
 
Do you have enough oak flooring to replace all four feet?
 
Do you have enough oak flooring to replace all four feet?
I have a ton, but it’s that interlocking flooring (if that’s important). And another thought: I have a regular oak board from another project that I could glue together to create one thick piece, too.

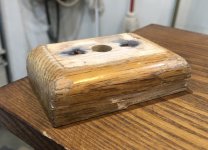
In order to get that nice roundover edge I would think I’d need a router table for that, wouldn’t I?
 
E3517619-CB9C-4BC8-ABE0-49AF8AFE4BBD.jpeg
It comes off! Well that changes things. Repairing this just got a little easier, probably.
 
Last edited:
Flooring is usually about 1 1/2 ” wide. If you can match the grain and finish the end grain it might work given that is is the feet. What are the measurements of the feet ? Width looks a littler bigger than 3/4”

I have a bar top done with flooring and it is the type that you can catch a fingernail in the joints. The living room floor is joints that you cannot hang a fingernail in.
Flooring is also not as thick as your feet seem to be from the photo.
 
I would use a router by running it along the straight (thin) side rather than the bottom. Screw or clamp a piece of wood to the router face to run along the bottom of the leg as a depth and straightness control to leave the top visible face intact. Or get a large flush cut bit and put a small bearing on it to achieve the same. That would be best if you can find a suitable bit
 
Flooring is usually about 1 1/2 ” wide. If you can match the grain and finish the end grain it might work given that is is the feet. What are the measurements of the feet ? Width looks a littler bigger than 3/4”

I have a bar top done with flooring and it is the type that you can catch a fingernail in the joints. The living room floor is joints that you cannot hang a fingernail in.
Flooring is also not as thick as your feet seem to be from the photo.
Well, seeing as the foot comes off, I think I could just run it through a table saw so it cuts only up to the top of the gouge. That way I wouldn’t need to deal with a roundover edge that I would need a routing table for. Then just glue in a slice from one of the flooring pieces and bob’s your uncle, right?
 
Well, seeing as the foot comes off, I think I could just run it through a table saw so it cuts only up to the top of the gouge. That way I wouldn’t need to deal with a roundover edge that I would need a routing table for. Then just glue in a slice from one of the flooring pieces and bob’s your uncle, right?
I’m not picturing where you add the slice of flooring. Seeing the screw holes, I figured the feet came of if they weren’t glued too well. How about cutting off up to the chunk and cut the other one to match and turn the flat sides to the wall? Oak is one of the harder woods, density-wise. If the rest of the frame needs to be stripped you have a job ahead of you.
 
I’m not picturing where you add the slice of flooring. Seeing the screw holes, I figured the feet came of if they weren’t glued too well. How about cutting off up to the chunk and cut the other one to match and turn the flat sides to the wall? Oak is one of the harder woods, density-wise. If the rest of the frame needs to be stripped you have a job ahead of you.
I’ll explain what I mean later. I just got reassigned to Christmas Eve dinner prep detail.
 
Oops! I thought the surface you're talking about is on the bottom of one of the feet and therefore wouldn't be seen. My bad.
LOL, I would never see that once it's down, especially if it was facing under the bed. But then again, I would usually take the easy route. :)
 
LOL, I would never see that once it's down, especially if it was facing under the bed. But then again, I would usually take the easy route. :)
The gouge faces out. I would have seen it from outer space.
 
I’m not picturing where you add the slice of flooring. Seeing the screw holes, I figured the feet came of if they weren’t glued too well. How about cutting off up to the chunk and cut the other one to match and turn the flat sides to the wall? Oak is one of the harder woods, density-wise. If the rest of the frame needs to be stripped you have a job ahead of you.
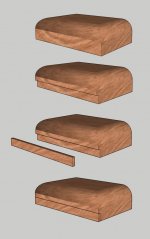
Okay, here's what I'm talking about.

1) Original whole piece (you have to imagine the gouge in the front).
2) After I run it through the table saw. The space created matches the total height and depth of the gouge.
3) Introducing a piece sawn from spare oak flooring (grain running in the right direction, of course). The piece will be a tiny bit larger than the space.
4) The new piece glued into the space, sanded and finished.

FIX.jpg
 
Okay, here's what I'm talking about.

1) Original whole piece (you have to imagine the gouge in the front).
2) After I run it through the table saw. The space created matches the total height and depth of the gouge.
3) Introducing a piece sawn from spare oak flooring (grain running in the right direction, of course). The piece will be a tiny bit larger than the space.
4) The new piece glued into the space, sanded and finished.

View attachment 67365807

That is what I would do for the repair.
 
If this fix works as well as it seems it would, I would also go ahead and just fix that smaller rear gash using the same method while I'm at it.
 
If you are really into it and want the pieces to all match you could remove all of the top pieces and make new ones.

It has been a while since I repaired furniture. I am more into doing segment and solid bowl turning.
 
If you are really into it and want the pieces to all match you could remove all of the top pieces and make new ones.

It has been a while since I repaired furniture. I am more into doing segment and solid bowl turning.

So two responses to that:

1) I'm confident that if I do this carefully the seams won't be noticeable from a reasonable viewing distance.
2) I'm not confident that I could reproduce the roundover edges seen in the original pieces without a router table. It's my opinion that those roundover edges are important to the design of the overall bed frame.

Go with your option one.

I am blessed to live in a retirement community that has a woodshop (7,000 sq foot building). We have about any imaginable piece of equipment in multiple numbers along with a good assortment of hand/power tools. Since moving here sold off all my large equipment and just kept what I need around the house.

The woodclub also has a group of members who do repairs for homeowners. They just got in a solid oak bed frame to repair.

Hope the repair goes well for you.
 
Chisel the rest of the chipped section. Use a plane to smooth it. Glue on a new strip.
 
Back
Top Bottom